How To Avoid Damaging Pipes During DIY Renovations Tips For A Safe And Smooth Project
If you’re diving into DIY renovations at your home or cottage in Ontario, it’s surprisingly easy to damage pipes if you aren’t paying close attention. Honestly, the smartest move is figuring out where all those pipes are before you start cutting or drilling. Just that one step can spare you a ton of trouble—think expensive repairs and leaks you never saw coming.
Pipes snake behind walls, under floors, and around water-heavy spots like kitchens and bathrooms. Take a little time to track down your plumbing lines, especially if you’ve got an older place or you’re out in Simcoe County or Muskoka, where cottage plumbing sometimes needs extra TLC. A few basic tools or even local guides can help you spot pipe locations without much fuss.
If you’re not feeling confident, you can always call a licensed journeyman plumber—Harris Plumbing covers York Region and surrounding towns, and they’ve been at this for 51 years. Sometimes, it’s just nice to have backup.
Understanding Your Home’s Plumbing Layout
Knowing the path your pipes take, how to read plumbing plans, and where most folks mess up can really help you dodge trouble during renovations.
Identifying Pipe Locations
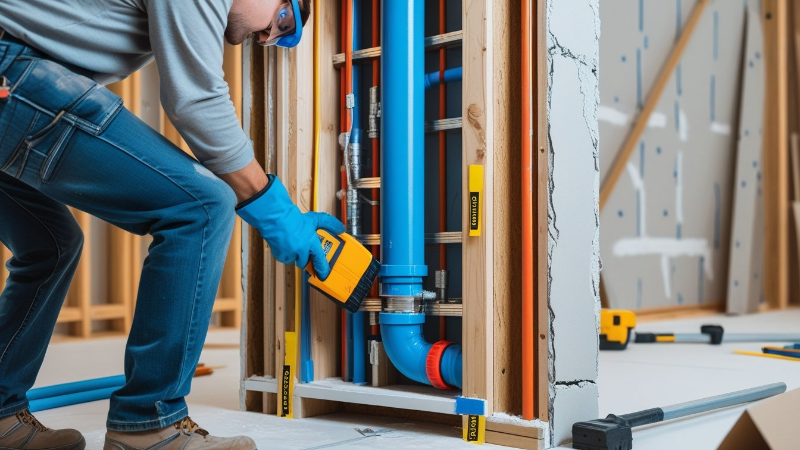
Before you grab a saw or drill, find your main water and drain pipes. Pipes usually live inside walls, under the floor, and right by fixtures like sinks and toilets. In Ontario, water pipes are often copper or PEX, drains are usually PVC or cast iron.
Check basements, crawl spaces, or utility rooms for exposed pipes. Try a pipe locator or just tap and listen along the wall (it’s not high-tech, but it works sometimes). Mark pipe spots with tape or chalk so you don’t get carried away and drill where you shouldn’t.
Reading Blueprints and Schematics
If you have the plumbing blueprints, give them a good look. They’ll show you pipe routes, sizes, and where the big stuff like water heaters sits. The symbols and lines can be a bit cryptic, but they’re worth deciphering.
Focus on the main supply lines, vent stacks, and sewer lines. Understanding how water moves through your place helps you avoid hitting something important. No blueprints? Try your local municipal office in Simcoe County or York Region—they might have copies or at least some advice.
Spotting Common Mistakes
A lot of DIYers get into trouble by not checking for pipes, or they just drill blindly. Don’t cut into walls without checking first. Also, if you’re swapping out fixtures, make sure your pipes can handle the change—pipe size matters more than you’d think.
Watch out for pipes running near electrical wiring. It’s easy to mix up conduit and plumbing pipes, and that’s a headache nobody wants. Pipes near exterior walls or crawl spaces in Ontario’s winters? Give them extra care to avoid freezing.
If this all feels overwhelming, Harris Plumbing’s licensed journeymen in Barrie or Muskoka can help you out.
Preparation Before Starting Renovations
Before you swing a hammer or fire up the drill, there are a few steps worth taking. They’ll help you steer clear of pipes hiding in your walls and floors. Knowing how to shut off the water, check what’s behind your surfaces, and having the right tools on hand can save you a pile of money and hassle.
Turning Off Water Supply
First, find your main water shut-off valve—it’s usually close to the water meter or where the main line enters your home. Turn it all the way off.
Next, open a few faucets to drain out any leftover water. This keeps things dry and lowers the chance of a surprise leak or burst. If you can’t find the valve or it won’t budge, call a licensed journeyman plumber in Barrie or Newmarket. Harris Plumbing is veteran owned and gets there fast.
Inspecting Walls and Floors
Take a good look at the walls and floors where you’ll be working. Look for water damage—damp spots, soft wood, anything that hints at pipes nearby or a slow leak.
A stud finder with a wire sensor can help you spot hidden pipes. If your house has old plaster walls, be extra careful—pipes might not follow modern layouts. Mark safe zones where you can drill or cut. It’s a small step that can save you a huge headache, whether you’re in York Region or Simcoe County.
Gathering the Right Tools
Having the right tools makes everything easier and a lot safer. Grab:
- Pipe wrenches
- Adjustable pliers
- Pipe cutters
- A stud finder that detects metal and wires
- Safety goggles and gloves
Check that your tools are in good shape before you start. If you’re working near septic systems or lake pumps, the right gear will protect both you and your plumbing.
Harris Plumbing always suggests using quality, purpose-built tools. It really does help you get things right the first time.
Safe Demolition Practices
Being careful during demolition can save you a lot of grief. Pipes hide behind walls and under floors, and a little caution goes a long way.
Using Non-Invasive Detection Tools
Before you start ripping out walls or floors, use detection tools to find pipes. Stud finders with metal sensors, moisture detectors, or even thermal cameras (if you’re fancy) can help you spot plumbing without making holes.
Take your time scanning—especially in older Ontario homes, where pipes might be wherever the last owner felt like putting them. If you’re unsure, ask a licensed journeyman plumber from Harris Plumbing in Simcoe County for a second opinion.
Marking Hazard Zones
Once you find the pipes, mark their paths with bright tape or chalk. Make those marks obvious to everyone working. It’s a simple thing, but it keeps accidents to a minimum.
Draw a quick plan showing where water, drain, and gas lines run. Keep it nearby for reference. If you’re working outside in York Region or Muskoka, remember that buried pipes can be fragile too—mark those areas as well.
Removing Fixtures Carefully
When it’s time to take out sinks, toilets, or tubs, shut off the water valves first. Loosen fittings gently and use the right tools so you don’t wreck the supply lines. If you can reuse fixtures, even better—it’ll save you money and hassle.
If you need to move drainage pipes, you might want to call Harris Plumbing to handle it safely. Taking your time here can prevent leaks and water damage, which nobody wants during a cottage reno or a Barrie home remodel.
Proper Drilling and Cutting Techniques
When you’re working near pipes, choosing the right spot to drill or cut, setting your depth, and using power tools carefully can make all the difference. It’s not rocket science, but it does take some patience.
Choosing Safe Drilling Locations
Before drilling, double-check where pipes might be hiding. A stud finder with a metal or pipe sensor is your friend. Avoid areas near water or gas lines—these are usually close to sinks, toilets, or boilers.
If you’re not sure, ask a professional from a local plumbing service like Harris Plumbing in Barrie or Newmarket. Building plans can help, too.
Mark safe spots clearly. If you have to drill near pipes, pick places with plenty of clearance. Take it slow—no need to rush.
Setting Drilling Depth Controls
Going too deep can wreck pipes hiding behind walls or floors, so set your drill’s depth stop. If your drill doesn’t have one, wrap tape around the bit at the right depth—works just as well.
Set the depth a bit shorter than the wall or floor thickness. That little buffer can mean the difference between a clean hole and a plumbing disaster, whether you’re in York Region or working on a Muskoka cottage.
Handling Power Tools Near Pipes
Power tools can vibrate or slip, and that’s how pipes get damaged. Always grip drills and saws with both hands for control.
Stick to a slow speed when you’re close to suspected pipe spots. That way, you’re less likely to slip and punch through.
Keep your tools sharp and in good shape. Dull blades need more force and are harder to control.
If you hit unexpected resistance, stop immediately. You might be right on top of a pipe. At that point, it’s best to call a licensed journeyman plumber from Harris Plumbing for advice.
What to Do if a Pipe Is Damaged
If you hit a pipe, acting fast can really limit water damage. You’ll need to stop the leak, protect your property, and arrange repairs as soon as possible.
Immediate Actions for Leaks
First thing—shut off your main water supply. That stops more water from flooding out. Next, open taps nearby to drain the pipes.
Grab towels or buckets to catch leaking water and protect your floors and furniture. Keep electrical devices far away from the leak. Snap a few photos for insurance, just in case.
If the leak’s near electrical gear or buried in a tricky wall cavity, cut power to that area. Better safe than sorry.
Temporary Pipe Repairs
Once you’ve stopped the water, patch things up as best you can. Pipe repair tape, rubber patches, or a hose clamp can work in a pinch. Wrap it tight or clamp it down over the leak.
For tiny pinhole leaks, epoxy putty can be a lifesaver. Just follow the instructions and let it cure before turning the water back on.
These are only short-term fixes. Don’t rely on them, especially near complex setups like septic tanks or lake pumps.
Contacting a Professional
Even if your patch job holds, call a licensed journeyman plumber for a real repair. Harris Plumbing has been helping folks in Barrie and Newmarket for over 51 years—they know how to fix things for good.
A professional will check for hidden damage and let you know if you need upgrades or extra protection for your plumbing.
If you spot water stains, damp walls, or weird smells after your repair, book a professional inspection right away. It’s not worth risking bigger problems down the line.
Frequently Asked Questions
A few simple steps before and during your reno can really help keep pipes safe. Knowing how to find pipes, working carefully, and sidestepping common mistakes will make things go a lot smoother.
What precautions can I take to protect my pipes before starting home renovations?
Shut off the main water supply to avoid leaks or floods. Open taps to drain any remaining water.
Wrap exposed pipes with padding or insulation to keep them from getting bumped. Keep heavy tools and supplies away from plumbing areas.
Can you provide tips for safely exposing pipes during a DIY remodel?
Use a stud finder or pipe detector to locate pipes behind walls. Cut slowly and use the right tools, steering clear of marked pipe zones.
Be gentle when removing drywall or flooring. Too much force can crack or bend pipes.
What are some common mistakes to avoid when working around plumbing during renovations?
Don’t guess where pipes are—use a detector or check your plans. Avoid hitting pipes with drills, saws, or hammers.
Don’t overload walls or floors near plumbing with heavy stuff. Watch out for sharp bends or extra pressure on pipes when reinstalling fixtures.
How do I locate pipes within the walls before drilling or cutting?
Check your plumbing plans if you’ve got them. Use electronic pipe detectors or stud finders made for plumbing.
Look for clues like shutoff valves, supply lines under sinks, or visible pipes in basements and crawl spaces.
What safety measures should be considered when handling pipes in a DIY project?
Wear gloves and eye protection so you don’t get cut or splashed. Use tools made for plumbing.
If you see corrosion or leaks, stop and call a licensed plumber. Old pipes can be touchy, and one wrong move can cause a lot of water damage.
How can I ensure I'm not putting too much pressure on pipes while renovating?
Try not to lean heavy stuff on pipes. When you’re installing or taking out pipes, make sure to support them with brackets or braces—don’t just let them hang there.
Avoid cranking down too hard on fittings or clamps. A lighter touch goes a long way to keep pipes from cracking or messing up connections.
If you’re in Simcoe County or York Region and want some real pros, Harris Plumbing has licensed journeyman plumbers who actually get how to protect your plumbing during renovations.